How to Make Sourdough Bread at Home: A Step-by-Step Guide for Beginners
You can make sourdough bread at home with just flour, water, salt, and a sourdough starter-a living culture of wild yeast and bacteria. This guide walks you through each stage, from mixing to baking, so you'll understand what's happening and feel confident about timing.
What Is Sourdough Bread?
Sourdough is bread made without commercial yeast. Instead, it relies on a sourdough starter: a mixture of flour and water that captures wild yeast and bacteria from your environment. This culture ferments the dough slowly over many hours, developing flavour and giving the bread its characteristic tangy taste and chewy texture.
The long fermentation-often 12 to 18 hours-is what sets sourdough apart from everyday bread. It's slower than instant yeast breads, but most of that time is hands-off waiting. You'll spend only 15 to 20 minutes actually working the dough.
Ingredients You'll Need
Here's everything you need to make a basic sourdough loaf:
- 500g bread flour (or all-purpose flour if bread flour is unavailable)
500g bread flour (or all-purpose flour if bread flour is unavailable)
- 350ml water (about 70% of the flour weight by volume)
350ml water (about 70% of the flour weight by volume)
- 10g salt
10g salt
- 100g active sourdough starter (fed and bubbly, ready to use)
100g active sourdough starter (fed and bubbly, ready to use)
That's genuinely all you need. No oil, no sugar, no additives.
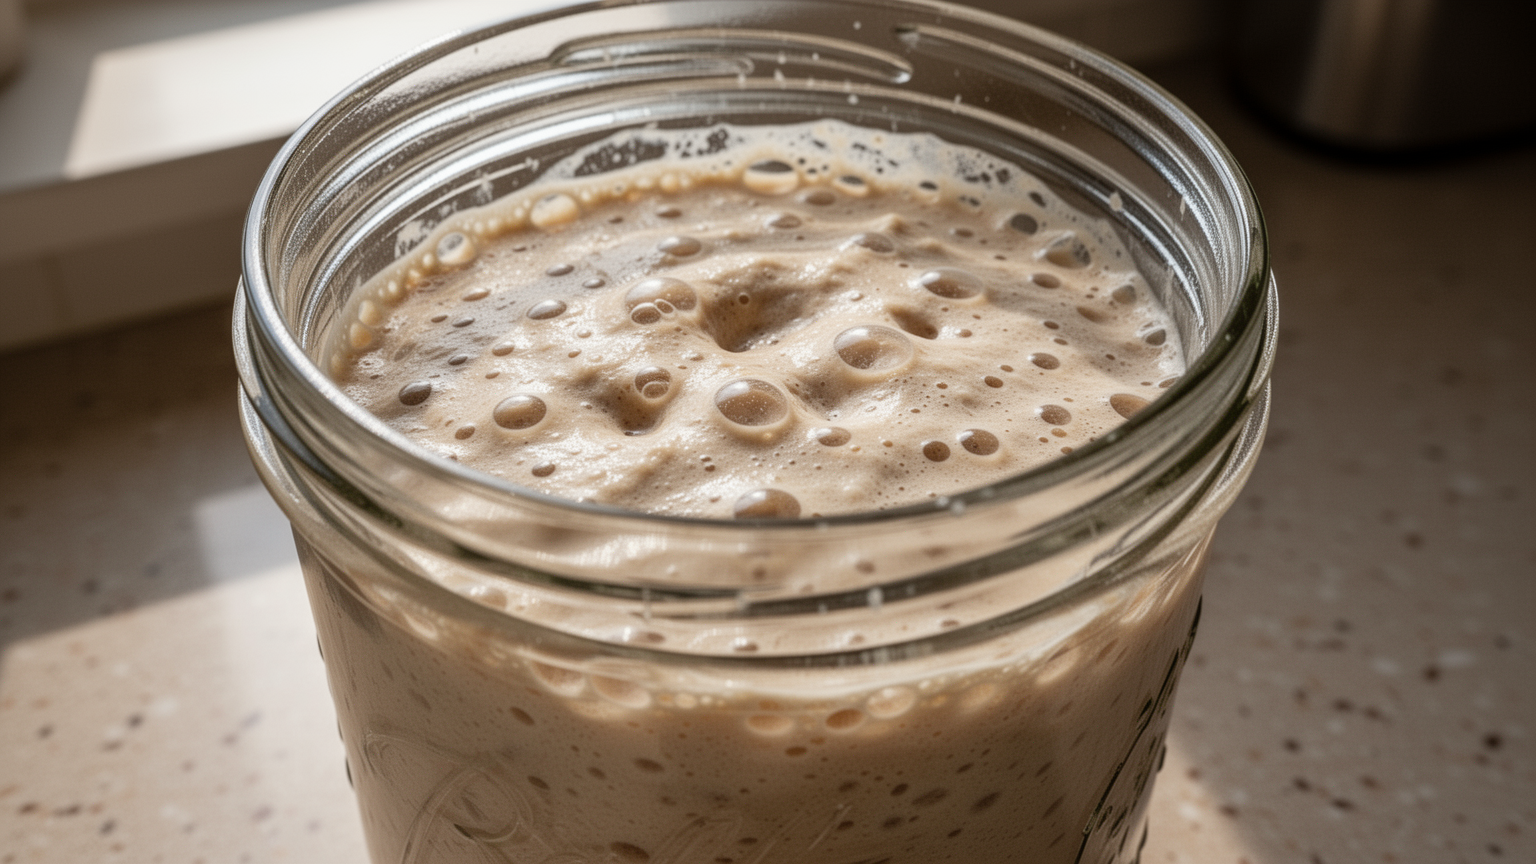
About the sourdough starter: This is the only ingredient that takes time to prepare upfront. A starter is a living culture you'll feed regularly-usually once or twice a week-by mixing in fresh flour and water. If you don't have one yet, you'll need to create it first, which takes 5 to 7 days. (Once you have it, you keep it alive indefinitely by feeding it regularly.)
The starter should be fed 4 to 8 hours before you use it, so it's active and bubbly at mixing time. You'll know it's ready when it's roughly doubled in size and has visible bubbles.
Step-by-Step Instructions
1. Mix the Dough (5 minutes)
Add 500g flour and 350ml water to a large bowl. Stir until all the flour is wet and no dry bits remain. It'll look shaggy and rough-that's normal.
Let it rest for 30 minutes. This pause helps the flour absorb the water, making the dough easier to work with later. It's called the autolyse rest.
2. Add the Starter and Salt (5 minutes)
After the 30-minute rest, add 100g active sourdough starter and 10g salt to the dough. Mix by hand-squeeze and fold the dough in the bowl until the starter and salt are fully incorporated. The dough will feel sticky and loose at this point.
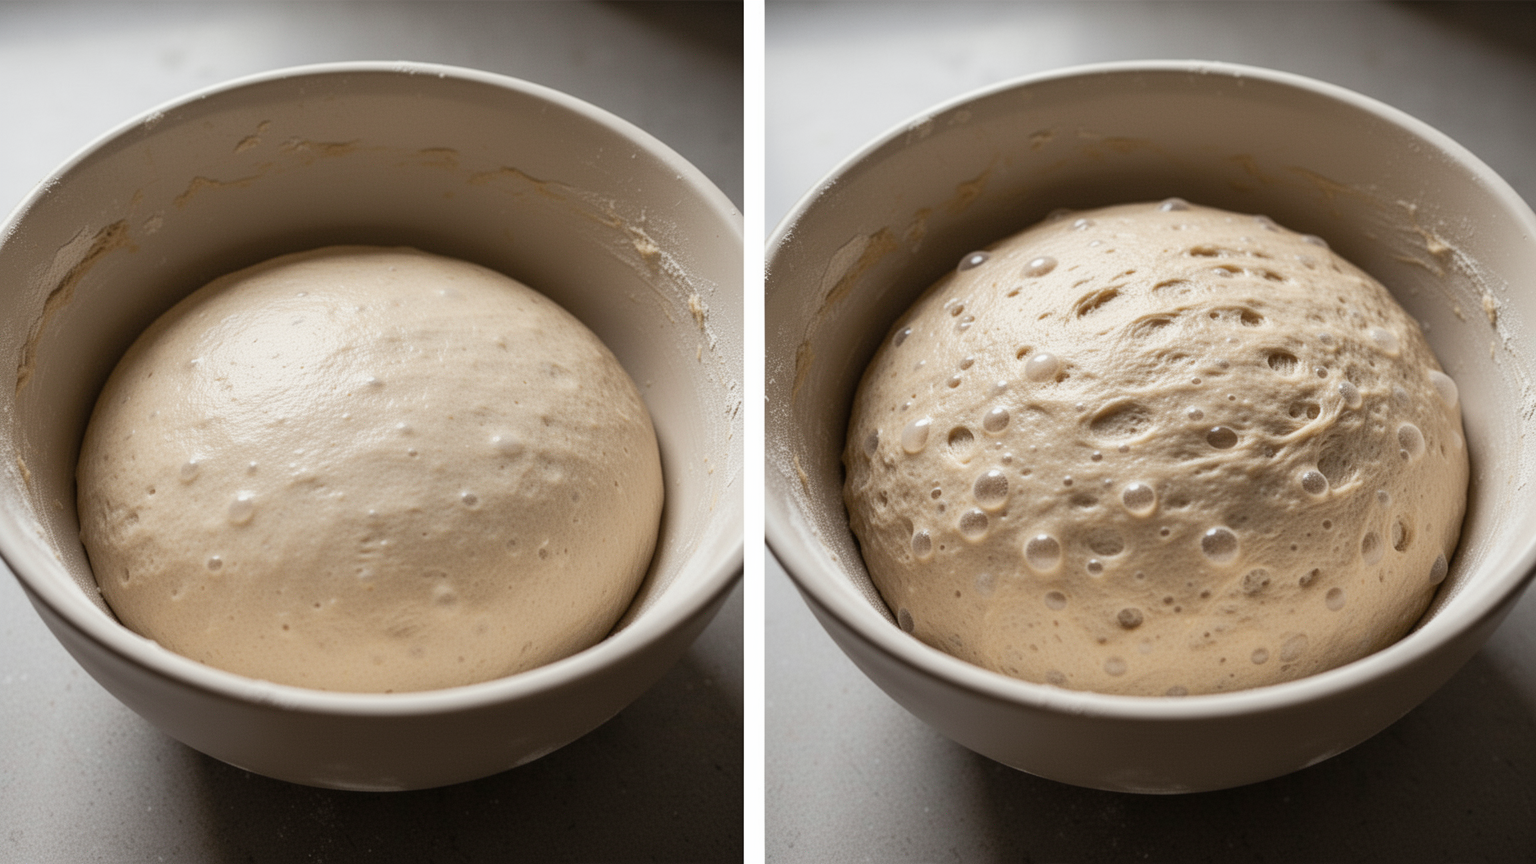
3. Bulk Fermentation (8-10 hours at room temperature)
Transfer the dough to a clean bowl (or leave it in the same one). Cover loosely with a tea towel or bowl cover to keep dust out while letting air circulate.
Leave it at room temperature-ideally between 20°C and 24°C-for 8 to 10 hours. During this time, the yeast and bacteria ferment the dough, developing flavour and strength.
You don't need to do anything during bulk fermentation. The dough will gradually rise and look airier, with visible bubbles on the surface. By the end, it should have increased in volume by roughly 50%-not doubled, just noticeably bigger.
Note on timing: If your room is warmer (25°C or above), fermentation will happen faster-maybe 6 to 8 hours. If it's cooler (below 20°C), it'll take longer, up to 12 hours. The warmer your kitchen, the quicker the process.
4. Shape the Dough (5 minutes)
After bulk fermentation, turn the dough onto a lightly floured work surface. It'll be soft and a bit sticky-that's correct.
Gently shape it into a round by folding the edges toward the centre, rotating as you go. You're creating tension on the surface, which helps the bread rise upward in the oven rather than spreading flat. Don't overwork it; a few folds are enough.
Place the shaped dough seam-side up (the bumpy side facing up) into a bowl lined with a well-floured tea towel, or into a banneton (a proofing basket). This supports the dough while it rests.
5. Cold Overnight Rise (8-16 hours in the refrigerator)
Cover the bowl and place it in the refrigerator overnight-or for up to 16 hours. The cold slows fermentation almost to a stop, making the dough easier to score (cut) and giving the flavour more time to develop. This step also makes the dough less sticky to handle.
If you're in a hurry, you can skip the cold rise and go straight to baking after shaping. The bread will still work, but the flavour won't be as complex. The overnight rest is worth doing if you have time.
6. Preheat the Oven (20 minutes before baking)
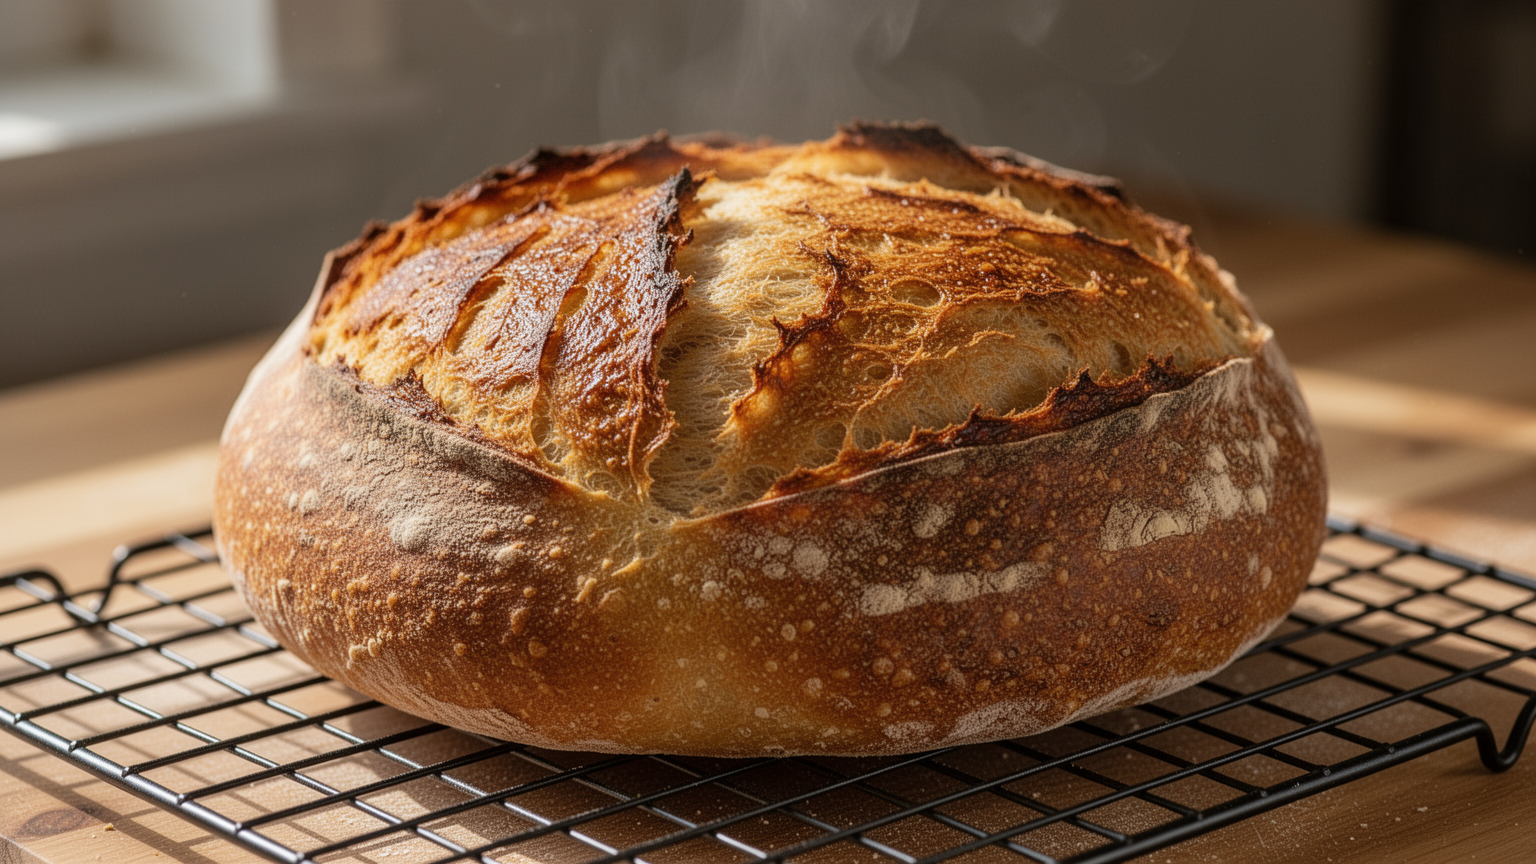
Heat your oven to 240°C (or as hot as it will go). Place a Dutch oven (a heavy-bottomed pot with a lid) inside so it heats up too. A hot Dutch oven traps steam around the dough as it bakes, which creates the crispy crust that defines sourdough.
If you don't have a Dutch oven, you can bake on a regular baking tray, but the crust won't be quite as dark and crispy. The bread will still taste good.
7. Score and Bake (30-45 minutes)
Remove the dough from the refrigerator. Using a sharp knife or a bread lame (a special slashing tool), make one or two deep cuts across the top of the dough. This controls how the bread expands in the oven and creates the signature "ear" along the cut.
Carefully turn the dough out onto parchment paper. Lift it into the hot Dutch oven (use the paper as a handle-it'll burn a bit at the edges, but that's fine).
Cover the Dutch oven and bake for 20 minutes with the lid on. This traps steam. Then remove the lid and bake for another 20 to 25 minutes until the crust is deep golden brown.
The bread is done when it sounds hollow when you tap the bottom.
Fermentation & Timing Explained
The timeline can feel unclear at first, so here's what's actually happening:
Bulk fermentation (8-10 hours) is when the dough develops strength and flavour. Yeast produces gas bubbles, making the dough rise. Bacteria create acids, which build complexity in taste. You're aiming for 50% volume increase, not a full doubling-if you wait until it doubles, it may over-ferment and collapse.
Cold overnight rise (8-16 hours) is optional but recommended. The refrigerator puts fermentation on pause without stopping it completely. This gives flavour more time to develop and makes the dough less sticky and easier to handle. You can bake straight from the fridge without letting it come to room temperature-the oven's heat will warm it up.
Total time from mix to finished loaf is roughly 20-26 hours , but almost all of it is waiting. Your active work time is about 20 minutes spread across the day.
Room temperature matters. Warmer kitchens speed fermentation; cooler ones slow it down. If you're fermented at 24°C, expect 8 hours. At 18°C, expect 12 to 14 hours. You're reading the dough itself-when it's noticeably puffed and bubbly, it's ready-not slavishly following a clock.
Baking & Troubleshooting
The Crust Is Too Pale
You need more oven time or higher heat. Make sure your oven is fully preheated and the Dutch oven is hot before you put the dough in. If the crust is pale after 45 minutes total, bake for another 5 to 10 minutes uncovered.
The Bread Didn't Rise Much
Either the starter wasn't active enough, or the dough didn't ferment long enough. Next time, feed your starter 6 to 8 hours before mixing (not just 4 hours). During bulk fermentation, watch for visible bubbles and a 50% rise, not a clock. If the dough looks flat, give it more time.
The Crumb Is Dense (Not Airy)
This usually means under-fermentation. The dough needs more time to develop gas bubbles. Extend bulk fermentation by an hour or two. Or, if your kitchen is cold, warm it slightly-a 22°C environment ferments faster than 18°C.
The Dough Spread Flat Instead of Rising Tall
The dough was either over-fermented (waited too long during bulk fermentation) or under-shaped (not enough tension on the surface). Next time, aim for 50% rise during bulk fermentation, not a full doubling. And when shaping, fold the edges more deliberately to create surface tension.
The Bread Has Large Holes Near the Top but Dense Crumb Below
This suggests the dough was handled too roughly during shaping, or fermented unevenly. Be gentler when turning it out and shaping. Also, make sure your fermentation temperature is even-avoid placing the dough near a cold window or warm heater.
Storage & Serving Tips
Sourdough stays fresh for 3 to 4 days at room temperature in a paper bag or on a breadboard. Don't wrap it in plastic-that traps steam and softens the crust.
After a few days, it stales (becomes dry and firm, not moldy). You can revive it by wrapping the loaf in foil and warming it in a 180°C oven for 10 to 15 minutes.
For longer storage, slice the cooled loaf, wrap the slices in foil, and freeze them. Toasting a slice straight from the freezer wakes up the flavour and texture.
The best time to eat sourdough is a few hours after it's cooled. The crumb continues to set as it cools, so cutting it while still hot will squash the texture.
FAQ
How do I know if my sourdough starter is ready to use?
Your starter should be roughly double its original size, bubbly on top and throughout, and smell pleasantly sour and yeasty. It should pass the "float test"-drop a small spoonful into water; if it floats, it's active. This usually happens 4 to 8 hours after feeding.
Can I make sourdough without a Dutch oven?
Yes. Bake on a regular baking tray or baking stone. The crust won't be quite as thick and crispy because there's no trapped steam, but the bread will still be good. You can also place a pan of hot water on the oven floor to add moisture, though it's less effective than a Dutch oven.
What if I can't bake after the overnight cold rise?
You can leave the dough in the fridge for up to 48 hours. Fermentation continues very slowly in the cold, so the flavour deepens. If you need to wait more than 48 hours, remove the dough, let it warm slightly, then feed your starter and start a fresh batch.
Can I use all-purpose flour instead of bread flour?
Yes. Bread flour has slightly more protein, which builds a stronger gluten network and creates a chewier crumb. All-purpose flour works fine and will give you a softer, slightly less chewy loaf. The timing and technique stay the same.
Why does my starter smell like acetone or nail polish?
That's normal. A hungry starter-one that's gone too long without feeding-develops a layer of alcohol on top as the bacteria ferment. Simply discard the top layer and feed the starter. It'll smell more pleasant within a few hours.
How often do I feed my starter if I'm not baking?
Once a week is enough for a starter kept at room temperature. Mix in equal parts starter, flour, and water by weight (for example, 50g starter, 50g flour, 50g water). If you keep it in the refrigerator and bake less often, you can feed it once every 2 to 4 weeks.
References
User research notes (n.d.) Sourdough yoghurt bread recipe . Unpublished.